
I could hear the wind whipping through the speaker of the phone as professional adventure filmmaker Ben Sturgulewski’s voice came through on  the other line. Like a true snow junkie, Ben proceeded to conduct our interview from the seat of a swinging chairlift amongst the Alaska winter elements, only that much more of a testament to his commitment to fusing passion with his life’s work. From his frozen chairlift desk, we asked Ben for some tips on how to maneuver the tricky lighting snow imposes and for some advice on nailing those jaw dropping shots.
For all of us hopeless winter romantics like Ben, fresh powder is the indescribable magic in such love affairs that keeps us coming back time and time again, but for an outdoor filmmaker or photographer lighting in a winter wonderland can be extremely tricky. Because snow is a highly reflective element the influx of refracted light can begin to confuse the light meter in your camera, especially on that sunny bluebird day.
Point Towards the Sun
Almost before I could finish asking the question: “What are tips or tricks you 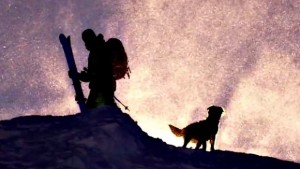 have for lighting in the sn…” he abruptly replied, “point towards the sun”. Through mitten muffled speakers he continued to explain how this is one of the most important tools to remember when shooting in snowy conditions. Shooting into the light will create godly backlight for your subject but will also add contrast to your image. Being no exception to the rule, golden hour is the ideal time to shoot in the snow not only because of the golden hue (and impressive sunburst) but also because the light is low on the horizon which creates more dynamic lighting.
Plan Your Day Around Light
In conjunction with this idea, Ben talked about how he plans his day around shooting in these lighting conditions. A typical shot day in the snow includes getting up and being prepared to shoot in the morning light, taking a break between noon and two o’clock, and then shooting until the evening light is gone.
Planning your shot day around light requires well conceived scouting. When scouting for a winter shoot here is a checklist of some questions to ask yourself in preparation: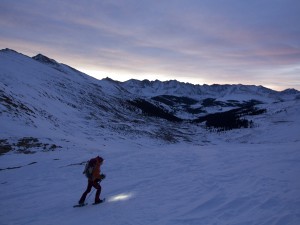
- What time will the sun rise/set?
- How much time do you need to set up?
- Where will the shadows be while you are shooting?
Google Earth is a great tool to use when trying to scout out a remote location, it will show you what the topographical landscape looks like, what the sun positioning will be at certain times of the day and you can even view on the ground shots of the area, all of which will give you a better idea about where you need to be and when.
Utilize your Histogram
Another tip for shooting in tricky lighting is to pay attention to your histogram to make sure you are not blowing out crucial or large areas of your frame. With that being said, it is acceptable and sometimes encouraged to allow your histogram to lean a little to the left (underexposed) to make sure you’re not losing the details of your shot. You can always brighten exposure with some editing but its impossible to recover the details that were blown out from extreme over exposure. So go ahead and take a few test shots to make sure your frame, shutter speed, exposure and lighting are what you want before the action begins.
Gear
Even if you heed all of the advice mentioned above, achieving a balanced exposure triangle can still pose a problem. With a little help from the right gear, you can solve any other lighting issues you might experience in snowy conditions.
- ND Filters (Neutral Density Filters)
ND Filters are extremely helpful for shooting in bright environments. These filters reduce the amount of entering the lens (to what degree depends on how you adjust them), allowing selections of aperture, shutter speed and ISO that would otherwise produce an overexposed image. This is super helpful when shooting in high light environments.
- Light meters
These are helpful for calculating an accurate reading for exposure and ambient light reflected from surfaces such as snow and water.
- Polarizer Filter
To help minimize the amount of blow-out while maintaining your desired exposure, add a polarizer filter to your lens. Polarizers are very effective tools to reduce reflections, remove the glare and make your colors pop!
Some extra winter shooting tips to consider: When shooting in snow be weary of where you step, you don’t want to ruin your scene by having foot tracks on freshly fallen snow. Also keep in mind that a white winter wonderland can be great for night time shots because of the refraction qualities of snow, any bit of moon will help illuminate the scene. So for all you fellow snowbirds out there, keep these tips in mind and don’t let the chilly weather and harsh lighting keep you from getting out there with your camera!