
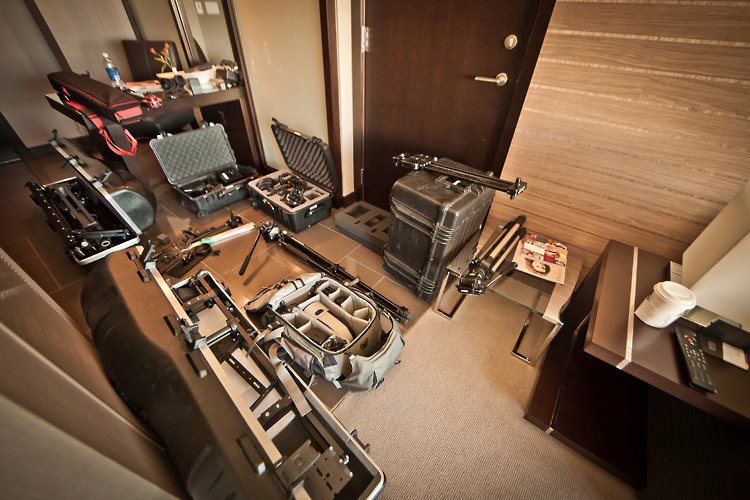
 Shooting a time-lapse is not a science. There is no perfect formula to ensure you are successful every time. However, there are a few things that will improve your chances of nailing your shot. In the video below, I will be covering the different types of equipment I USE TO SHOOT A TIME-LAPSE.
This post will cover:
- Triggering Your Camera
- Powering Your Camera
- Filters, Cards & Cleaning Supplies
- Support Gear
- iPhone Apps
- Post-Production Equipment
This post will be evolving as I continue to produce the series. I will add any new products that are mentioned in other videos into this post.
***NOTE: All opinions & perspectives shared come from my experience as a shooter and may not be the best way of doing things. I am simply sharing MY WORKFLOW when both capturing and processing RAW time-lapses***.
HARDWARE/SOFTWARE SOLUTIONS
Triggering your Camera
The first thing you need to do is find a way to trigger your camera and there are a few different options that exist. Now depending on the camera you are using, you may have an intervalometer built in. However, WHEN I SHOOT A TIME-LAPSE, I USE ONE OF FOUR OPTIONS.
The first is the Canon Intervalometer which is the most pricey of the bunch. It works great however, this is my second Canon intervalometer and the cable frayed on both. The next solution is the no-name intervalometer. The one in the video was purchased from Amazon and does everything that the Canon intervalometer BUT the cable can be removed or replaced if necessary. There are many options on either Amazon, B&H or eBay for whichever camera you may be using.
The third solution I use is a battery grip with an intervalometer built in. I purchased it in a kit with 2 batteries, a remote and cable release for under $100 on eBay. It is another cheap solution, however, sometimes when using the grip you loose control of the aperture dial and you need to remove the grip and re-install it to regain access to the aperture dial. Just something to keep in mind.
The last solution I use most often is the Kessler Camera Control Module. This unit, in conjunction with the Oracle is by far the most versatile of the group when shooting motion controlled time-lapses. It allows you to accomplish more things than the standard intervalometer, such as shoot-move-shoot. I will touch on this more when I go more in depth about shooting motion controlled time-lapses.
Powering Your Camera
Now once you have a device that will trigger your camera, you need to worry about powering your camera. For this, I have a few different options in front of me.
When shooting shorter time-lapses, I use both Canon batteries as well as the no name flavour. The no name flavour works great and is a fraction of the price. However, it is key that they are the ones that will charge on your canon chargers as there are some solutions that will require a proprietary charger. In my experiences however, the Canon batteries seem to hold the charge longer.
If I am doing longer time-lapses, I use one of three options. The first is a battery grip. In front of me are two different options. The first is the Canon battery grip and the second one is the no name flavour. They do virtually the same thing, however, the Canon grip is much more reliable than the no name one. This solution lasts for approximately 6 hrs for me — depending on how old your batteries are or if you are using the canon batteries or the no-name ones.
The second solution are the Kessler batteries. Using the cable suited to your camera in conjunction with one of these batteries, you can do extended time-lapses — multiple day time-lapses if you want. There are three different options for batteries. You have the Bescor 12v (7.2 Ah) battery, the Bescor 12v (7.2 Ah) battery and the new Kessler ION BATTERY SYSTEM (lithion iron phosphate battery) as well.
Kessler ION Battery System
– Ultra-light weight.
– Most powerful and longest lasting battery on the market for the weight.
– Provides up to 4 times the life of other conventional battery systems.
– Can handle 2000+ charge cycles.
– There is no charge “memory effect”.
– Built in smart battery charger with charge meter so you can easily top off the battery.
– Weather proof padded case with built-in device storage and rain guard for when the
weather gets rough.
The last solution I use for powering my camera is the Canon wall mount adapter (ACK-E6 AC ADAPTER). If I have access to AC and am wanting to do multiple day time-lapses, this is my go-to solution.
Other Accessories
There are a few other essential elements that I have in my kit as well when I am shooting. I will cover each item more extensively when we setup the time-lapses. The first thing you will want in your kit are filters and there are many solutions on the market. Obviously the more you spend, the better they will be. When I shoot time-lapses, I use Polarizer filters, Vari-ND filters & grad filters.
Polarizer filters are used to reduce reflections on some surfaces as well as bring out the sky. Vari-ND filters are used to control up to 8-stops (depending on filter) as well as blur motion when shooting during the day. Grad filters are used to darken an overly bright part of the scene.
I recommend spending a bit more on your filters. If you are putting glass in front of your lens, it should also be high quality.
You will also want to make sure you keep your lenses and sensors clean. I don’t know how many time-lapses I have ruined from not having a clean sensor or lens. Take ten minutes after each shoot to make sure your gear is clean. It will help with the longevity of your gear. I use sensor cleaners, lens wipes, lens clothes and a puffer to keep things clean. I will show you in a later video how I clean my camera after a shoot.
As for media, I have had great success from the Transcend cards. The price point is great and have yet to have any issues with buffering time from these cards — or loosing data from corrupt files.
Another piece of gear I have in my kit is my phone. On my phone there are a few different apps I use to help with time-lapses. The first is the Kessler App which has many great tools built in — including a time-lapse calculator. I will be covering these apps in a later video.
iPHONE APPS
– Kessler App
– Sun Seeker
– Star Walk
– Google Earth
– Weather
– Maps
– DSLR Remote
– Sunrise & Sunset
If there are any apps that you find helpful when shooting time-lapses, please add to the comment section below.
Supporting your Camera
Static Time-Lapses
The first type of time-lapses we are going to look at are static time-lapses and there are a few variables to consider when selecting your gear. You will want to consider the type of shot you want to accomplish as well as the environment you are shooting in (including the surface you are shooting on, if you are hiking long distances or if it is windy).
There are three types of tripods I choose between. If I am hiking long distances I will choose both the gorilla pod and a small carbon fibre tripod (Manfrotto 190CXPRO3 3-Section Carbon Fiber Tripod Legs). The brand doesn’t matter for tripods, however, I have included the model number of each item. The Gorrilla-pod is great because of it’s size however, it is limited on the types of shots you are trying to accomplish as well as weight capacity. The small tripod is a great solution, however, if it is either windy or if you are shooting on a surface, such as sand, it may be difficult to keep the camera stable. One thing you can do is attach a weight to the centre column to bring the centre of gravity lower. I will talk more about this when we setup a static time-lapse.
The most versatile option of the bunch when you aren’t hiking long distances is a heavy duty carbon fiber tripod (Manfrotto 536 4-Section Carbon Fiber Tripod). This tripod is great because it is relatively light and it’s reach is outstanding. At it’s lowest height, you can get the camera about a foot off the ground and with the same setup, you can get your camera about 8ft in the air.
Now, if you are just getting into shooting time-lapses and are either unsure what to purchase or your budget doesn’t allow for the products I am using, just keep in mind the basic elements of each section. Light tripod for longer hikes — heavy duty tripod for other applications. Basically any type of tripod will work. However, if you are going to spend any money on gear, don’t skimp on a tripod or other support gear as support gear always outlasts your camera if you take care of the gear.
When you are shooting either Astro Time-Lapses, Day-To-Night Time-Lapses, Bulb Ramping, Boat-Lapses or Walk-Lapses, you want to make sure you are using a heavy duty tripod in all scenarios. It is extremely important to have a solid base when setting up any of the shots. I will include a more extensive breakdown of rigging in each of the sections when I set the shots up.
Motion Controlled Time-Lapses
The last section I want to look at in this video are the different motion-controlled setups. I will be focusing exclusively on Kessler gear for this section. If you have any questions or were hoping that I was going to cover other solutions, please read my ETHICS STATEMENT. I have used other solutions but Kessler gear is by far the best solution I have used. When shooting time-lapses, time is money and it is extremely important to have gear that is consistent.
Kessler offers a few different solutions depending on your shooting scenario. For either hiking or traveling there are two solutions. The first is the traveler and mini length sliders. These are extremely compact and fit in a suitcase. A new solution that has come out from Kessler is the Shuttle Pod Mini which breaks down into a small kit for travel. If you want to make it longer, simply attach more sections.
Shuttle Pod Mini
The Kessler Shuttle Pod Mini is a smaller, easier to transport version of the original Shuttle Pod. It is about half the size and half the weight of its big brother, yet still provides the versatility needed to get the manual or motorized shot you require.
The Shuttle Pod Mini is designed to break down into a small, easy to manage package. Using the shorter 2’ rail sections, it can even be stowed in a backpack for those long hikes up the mountain.
If you aren’t looking for a compact solution, there are other options as well. There is the Cineslider that comes in either 3ft or 5ft as well as the full size Shuttle Pod. If you are looking for moves longer than 5ft, you will want to purchase the full-size Shuttle Pod.
For each of the dollys/sliders above you will need to also motorize them. To view a few different options, check out the Kessler website.
SOFTWARE SOLUTIONS
There are a few different software solutions I use as well and will be touching on each when I do the post-production section. These programs will include Premiere Pro, LR Timelapse, Lightroom, After Effects, Photoshop, FCP 7, Quicktime 7, GB Deflicker, CHV Time Collection, ProRes vs CineForm, Photomatrix, GBS Timelapse & more.
If you have any questions, feel free to ask in the comment section below.