
Having an active presence online is an important element of your business – whether through a website, facebook page or twitter profile. If your business does not have an online presence, you are losing valuable business opportunities as well as customers. When thinking of how to approach building a new website, there are a few questions to ask.
- Who is the website for?
- What is the subject matter?
- Do you have a brand?
- Are you wanting to establish a brand?
- What is your budget?
- Who will be managing the site?
Once you have answered the questions above, you will then be able to determine the route to take – either an agency or do it yourself. If the website is for you and you do not want to hire someone to build and maintain your site, there are a few online services to help with this. My website is built off of the WordPress because of it’s security features and versatility.
Although there are many online options, this post will show you how to build a website off of the WordPress platform.
How to Begin
Building a website can be done is eight easy steps. Like anything, the more prepared you are the smoother the process will go. Although the steps may seem overwhelming, a new website can be built within 2 hrs.
- Hosting
- Domain Name
- Website Blueprint
- Install Framework
- Implement Design
- Publish
- Promote
- Maintain
By following the guideline set below, no matter your level of technical knowledge, you will be able to build your own website.
1. Hosting
The first thing you will need to do is find a hosting company that will house your website. There are many options that exist but my go to solution is Host Duplex for many reasons. If I ever have any issues with my website, these problems are resolved within minutes. I have been with a few different hosting companies but none have offered the same support the Host Duplex has. They are also great at communicating with their customer by being extremely transparent. If you are unsure about any part of the process, simply submit a ticket through their website.
To sign up for a hosting plan with Host Duplex, click here.
2. Domain Name
Once you have selected a hosting provider, you then need to reserve your domain name. This can be done through another provider but I definitely recommend supporting Host Duplex as well.
What’s in a Name
When selecting a name, think of what would best represent your brand. This stage is extremely important in the visibility of your company. Many business owners and Internet entrepreneurs rush into registering a domain without doing enough research. While the domain name isn’t the most important factor in the success of your business’ online presence, it is important enough that you should look into it and optimize the name to suit your business.
There are a few tips to consider when selecting your name. First off, consider choosing a domain name based on keywords. By doing this, you will have the immediate privilege of ranking high with the term selected. Secondly, make sure to choose a unique name. Do a search to see if anyone else is using a similar name. Originality is extremely important. Make sure to also keep the name short and simple. This will help people remember your URL. Lastly, I highly recommend purchasing multiple extensions (.com/.ca/.net/etc) so there is no confusion when people enter the first URL. On many occasions, when I have tried to search for specific sites that aren’t unique, I land on the wrong webpage.
How To Proceed
- Research the keywords of the niche and choose a few that would go well.
- Buy multiple extension names.
- Make your domain name as short and simple as possible. If you are building a brand, go for something original.
Things To Avoid
- Never use long domain names.
- Do not include the letters q, z, x, p or w unless necessary as these are the letters people most commonly type incorrectly.
- Never use slang in your domain name.
- Avoid numbers and special characters. However, this doesn’t mean you can’t use these to build a brand.
3. Website Blueprint
Before you start the design stage of your website (searching for a ‘look’), you will want to break down your website blueprint. Effective websites employ a strategy for long-term success by basing their design on the model below:
- Intuitive Navigation
- Aesthetic Appeal
- A Strong Message
- Clean and Consistent Design
- Quality and Consistent Content
This blueprint should also have some specific pages to aid the viewer while on your website. Within this blueprint, you should also breakdown the content that will be focused on with your site. Determine how you are going to deliver this content to your viewer.
- About page
- Contact page
- TOS page
- Privacy Policy page
- Sitemap / Archives
4. Install Framework
Once you have developed the blueprint for your site, you will then need to install the framework so you can start building the pages. To do this, there are two ways you can approach it.
CPANEL INSTALLATION
The easiest solution is to install WordPress through the CPANEL. Simply scroll to the bottom of your cpanel and click on the WordPress link and then follow the steps to install. This can be done within minutes. By going this route, you will be emailed when a new version of WordPress becomes available. This is great to ensure that you stay up-to-date with security on your site.

![]()
FTP INSTALLATION
This method of installation requires a little bit more effort but is still extremely straight forward. The first thing you will need to do is visit the CPANEL and setup a new database through MYSQL.


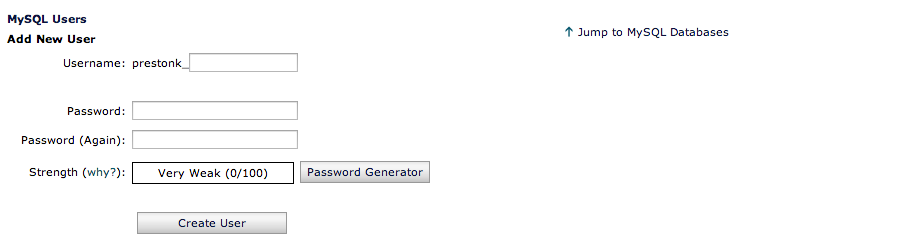

Once you have created a new database and added a new user, you will then want to download WordPress. You will first need to download WordPress and then add it to the main directory of your public_html folder in your hosting account. You can get your details for your hosting provider. Following this, you will then want to visit your domain name and then add /wp-admin.php.
5. Implement Design
Settling on the design is one of the hardest parts of the process. There are a lot of good templates available but finding one that best suits your business is a challenge. I have had tremendous luck with Themeforest.
6. Publish
Before publishing, you will want to run through the checklist below to ensure you have included all the essential elements.
- Key pages (About, Contact, TOS, Privacy Policy, Archives/Site Map)
- Copy-write proofread
- Consistent design
- Quality Content
7. Promote
Half the battle of developing a website is promotions. It is key that you maintain an active online presence when trying to promote your website. The key element that will attract people to your website is quality content.
8. Maintain
The amount of effort that goes into maintaining your website always depends on the style of content. If you are not constantly adding new content, you will want to simply keep up on updates. However, if you are adding new content on a regular basis, you will want to ensure that you do so on a consistent basis.
Once you have developed your website, the next thing you will need to do is BUILD YOUR AUDIENCE